This post is a part of the 2017 CQuIC computing summer workshop tutorial materials with the audio records available from the linked website. Please download the lesson material in order to run the examples used in this lesson. This tutorial is adapted from the Software Carpentry workshop under the Creative Commons license.
Version control really comes into its own when we begin to collaborate with other people. We already have most of the machinery we need to do this; the only thing missing is to copy changes from one repository to another.
Systems like Git allow us to move work between any two repositories. In practice, though, it’s easiest to use one copy as a central hub, and to keep it on the web rather than on someone’s laptop. Most programmers use hosting services like GitHub, BitBucket, GitLab or the UNM GitLab service for UNM members to hold those master copies; we’ll explore the pros and cons of this in the final section of this lesson.
Set up local and remote repositories
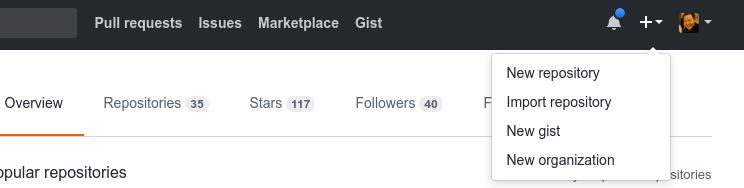
Let’s start by sharing the changes we’ve made to our current project with the world. Log in to GitHub, then click on the icon in the top right corner to create a new repository called testwebsite:
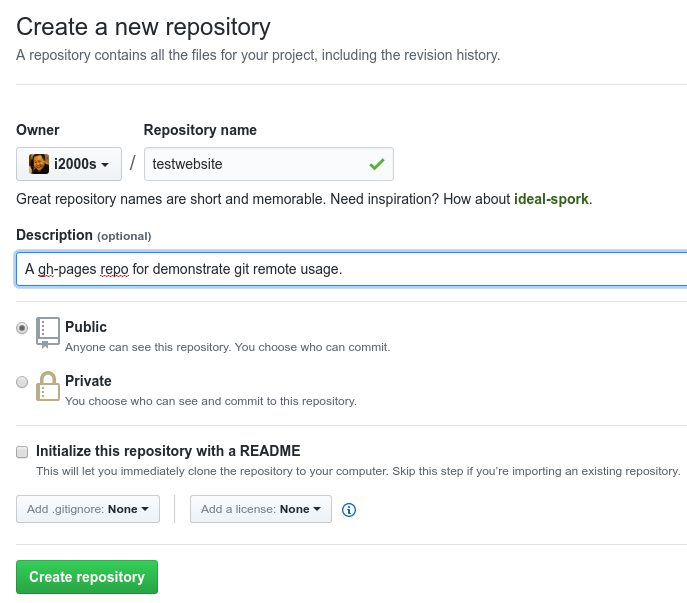
Name your repository “testwebsite” and then click “Create Repository”:
As soon as the repository is created, GitHub displays a page with a URL and some information on how to configure your local repository:
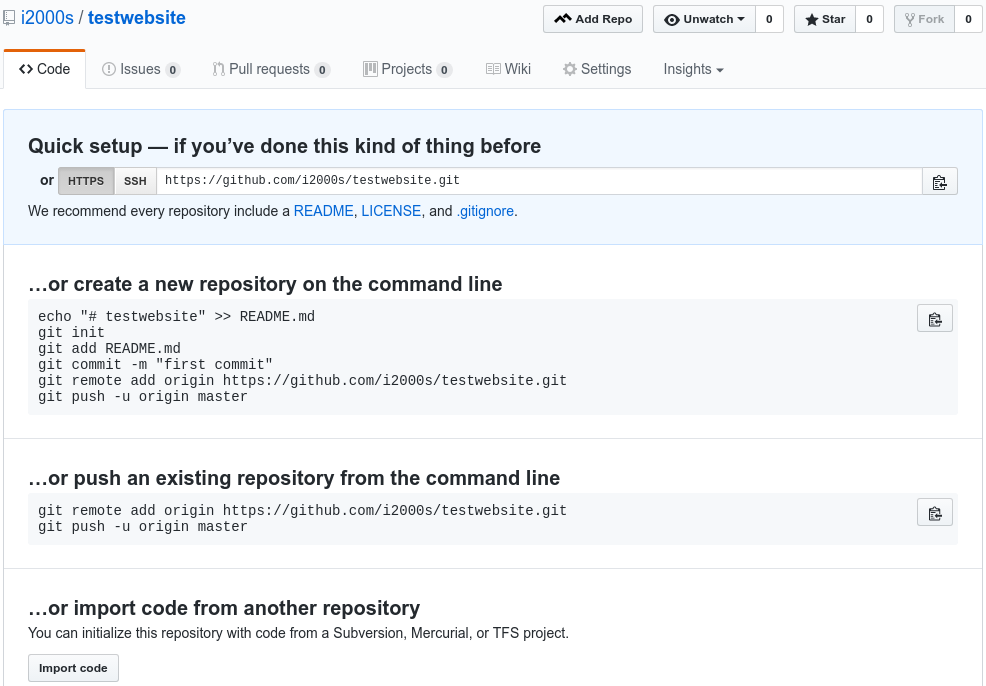
This effectively does the following on GitHub’s servers:
mkdir testwebsite
cd testwebsite
git init
Now, we have created a repository on the GitHub server as a remote repository, but the remote repository on GitHub doesn’t contain any files yet. We will need to create local files and upload them to the remote repository. To do that, you can navigate to your local working directory pre-downloaded from the IT workshop repo and then
git init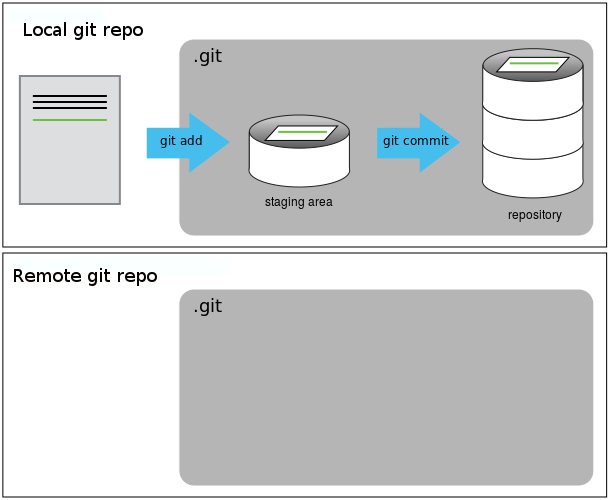
The next step is to connect the two repositories. We do this by making the GitHub repository a remote for the local repository. The home page of the repository on GitHub includes the string we need to identify it:

Click on the ‘HTTPS’ link to change the protocol to HTTPS.
A side note on HTTPS vs. SSH
We use HTTPS here because it does not require additional configuration. After the workshop you may want to set up SSH access, which is a bit more secure, by following one of the great tutorials from GitHub, Atlassian/BitBucket and GitLab (this one has a screencast).

Copy that URL from the browser, go into the local testwebsite repository, and run this command (replace i2000s with your github username–so as all similar commands in this article):
git remote add origin https://github.com/i2000s/testwebsite.gitMake sure to use the URL for your repository rather than i2000s’s: the only difference should be your username instead of i2000s.
We can check that the command has worked by running git remote -v:
$ git remote -v
origin   https://github.com/i2000s/testwebsite.git (push)
origin   https://github.com/i2000s/testwebsite.git (fetch)
Push to remote
The name origin is a local nickname for your remote repository. We could use something else if we wanted to, but origin is by far the most common choice.
Once the nickname origin is set up, this command will push the changes from our local repository to the repository on GitHub:
$ git push origin master
Counting objects: 130, done.
Delta compression using up to 8 threads.
Compressing objects: 100% (127/127), done.
Writing objects: 100% (130/130), 1.03 MiB | 0 bytes/s, done.
Total 130 (delta 21), reused 0 (delta 0)
remote: Resolving deltas: 100% (21/21), done.
To https://github.com/i2000s/testwebsite.git
 * [new branch]      master -> master
Branch master set up to track remote branch master from origin.
Note that, in the pushing process, you may be asked to provide a github username and password. This could happen every time you push a repo to remote. You can actually set up a default username to the remote URL so that git won’t ask you your github username again. The new url should be something like https://[email protected]/testwebsite.git (replace i2000s with your real github username). This URL can either be modifed by editting the .git/config file or type command line
git remote set-url origin https://[email protected]/testwebsite.gitIf you want not to type your password every time neither, you can replace the url to origin in the formation of https://i2000s:[email protected]/testwebsite.git.
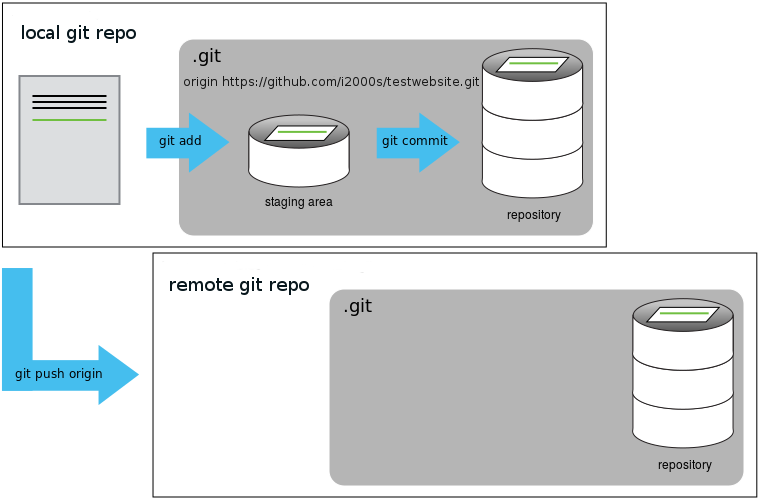
Up to now, our local and remote repositories are in this state:
When you push for the first time to a remote, you may also want to use a -u option used with git push. This option is synonymous with the --set-upstream-to option for the git branch command, and is used to associate the current branch with a remote branch so that the git pull command can be used without any arguments. To do this, simply use git push -u origin master once the remote has been set up.
Pull from remote
We can pull changes from the remote repository to the local one as well:
$ git pull origin master
From https://github.com/i2000s/testwebsite
 * branch            master     -> FETCH_HEAD
Already up-to-date.
Pulling has no effect in this case because the two repositories are already synchronized. If someone else had pushed some changes to the repository on GitHub, though, this command would download them to our local repository.
In the case that you have many branches, and don’t want to automatically merge the changes to your local branch, the pull command can be actually decomposed into to two steps:
$ git fetch origin
$ git merge origin/master
The first line fetch the changes from all branches to your local computer which will yield an output to show which branch got a change. The second line merges the change on the master branch from the remote fetch to your current local branch. This command is very flexible so that you can merge arbitrary remote branch to your current local branch.
GitHub GUI and collaboration features
Browse to your testwebsite repository on GitHub. Under the Code tab, find and click on the text that says “XX commits” (where “XX” is some number). Whenever you push the contents of your local repository to the remote, GitHub also generate a timestamps for each commit. Hover over, and click on, the three buttons to the right of each commit. What information can you gather/explore from these buttons? How would you get that same information in the shell?
The answer is the following: The left-most button (with the picture of a clipboard) copies the full identifier of the commit to the clipboard. In the shell, git log will show you the full commit identifier for each commit.
When you click on the middle button, you’ll see all of the changes that were made in that particular commit. Green shaded lines indicate additions and red ones removals. In the shell we can do the same thing with git diff. In particular, git diff ID1..ID2 where ID1 and ID2 are commit identifiers (e.g. git diff a3bf1e5..041e637) will show the differences between those two commits.
The right-most button lets you view all of the files in the repository at the time of that commit. To do this in the shell, we’d need to checkout the repository at that particular time. We can do this with git checkout ID where ID is the identifier of the commit we want to look at. If we do this, we need to remember to put the repository back to the right state afterwards!

Now, let’s see some functions that are only available using GitHub and other remote services. On your web browser, go to https://github.com/CQuIC/dont-forget-names. This is the Don’t Forget Names equation table put on the wall in the CQuIC coffee room with the initiative by Josh Combes and other CQuIC students. What we are exploring here are the features that really make collaboration easy. As shown in the figure above or the GitHub interface you see on your web browser, the line below the repo’s name includes a few menu buttons named as Code, Issues, Pull Requests, Wiki, Settings and Insights.
You can try click on the Fork button on the right-above corner of Insights menu item. That way, you have made an associated copy under your own GitHub account, and GitHub should be forward you to your own forked repo after this operation. Feel free to clone the forked repo to your local directory and compile the PDF by running make in your command terminal. If you would like to add your own name as an “equation” or a “formula” in the TeX file, you can commit the change and push it to your forked repo. Now, you should be able to click on the “Pull Request” button to push your own changes to the Dont-forget-names repo under the CQuIC account – let’s call it as the upstream repo. Before you do the Pull Request (PR), it is always good to commit your updates to a new branch other than the default master branch by, for example, git checkout -b patch-1 git add . git commit -m "Update new names." git push origin patch-1 Next, on your web browser click on the Pull Request button and select the patch-1 branch to be pushed to the master branch of the upstream repo. After this operation, the upstream repo on the web browser should have a flagged a new Pull Request if you click on the Pull Requests menu item. A member of the repo who has write access can then merge/rebase/commit on your PR.
One can also use the Issues menu page to start discussing bugs, features requests or problems related to the code in the repo. An issue can be closed or organized with other issues–even crossing repos on the Projects page.
The Wiki page is nothing but a repo with GitHub-flavored Markdown documentations (we will discuss later). One can edit the wiki pages of the repo online through the GitHub interface or edit them locally by cloning the repo with git clone https://github.com/YOUR_USERNAME/YOUR_REPOSITORY.wiki.git In our case, YOUR_USERNAME is the organization name, CQuIC; YOUR_REPOSITORY is Dont-forget-names.
The Settings page, as you can guess, has all the common options the owner of the repo can manage how the repo is organized, like inviting GitHub members to join the repo with read/edit/management permissions, and switching the repo to be visible or invisible to public. If you are an owner of the CQuIC or other organization on GitHub, you can have more options to grant permissions to collaborators in a very detailed level.
These features of GitHub facilitate collaborations among people inside or outside of the repo group in a great extend.
GitHub License, README files and the gh-pages branch
In this section we learned about creating a remote repository on GitHub, but when you initialized your GitHub repo, you didn’t add a README.md or a license file. If you had, what do you think would have happened when you tried to link your local and remote repositories? In this case, since we already had a README file in our own (local) repository, we’d see a merge conflict (when git realises that there are two versions of the file and asks us to reconcile the differences). We will discuss git conflict resolving in the next session, and for now, we will take a look on the README.md file provided in the folder and create a new branch to generate a static website via GitHub.
Now, you can use your favorite text editor to preview the README.md file. The *.md extension usually means the file is a markdown file. Specifically, here we use the GitHub Flavored Markdown syntax for styling documentations as a markup language implementation supported by GitHub. I personally use Atom to edit markdown files since it has an integrated Markdown previewer. If you do want to use Atom, you can press Ctrl + Shift + P and type in Install packages to find the install packages/themes function in the menu (or use the menu Packages/Settings View/Install Packages/Themes to open the panel); In the search bar, type in markdown-preview to see if you have the markdown previewer (the one with the Atom logo) installed or not; If so, go to File/Add Project Folder and add your current git local working directory as your project, open the README.md file on Atom, and navigate to the menu called Packages/Markdown Preview/Toggle Preview to open up a second preview panel along side of the README.md source file.
From the preview panel, you can easily see how the markdown syntax generates basic formations and how complicated formations can be all managed in plain texts.
Similarly to the license file. Normally, we need to be clear on what is the protocol to use the content, and the LICENSE file serves the purpose. More details can be found in this tutorial.
In this part, we will start making a Jekyll website using github’s GitHub pages service.
Now on your computer’s terminal, create a new branch based on the master branch by
git checkout -b gh-pages
git push origin gh-pages
This will create a new branch called gh-pages and push it to the remote repository. As a result, GitHub renders your markdown or HTML template/segment codes into HTML files using a Jekyll engine and generates a static website at https://i2000s.github.io/testwebsite. You can view it on your web browser.
Comparison among remote repository hosting service providers
Before we jump into GitHub even more, let’s talk about briefly on the similarities and differences among popular git remote service providers as mentioned at the beginning of this tutorial. A detailed comparison among GitHub, BitBucket, GitLab and Coding can be found here. We have created a GitHub organization for CQuIC so that we can create infinite number of private repos free of charge as a research and educational body. Feel free to best use this opportunity through the CQuIC@GitHub interface. Similarly, there is also a CQuIC organization on GitLab in case we need some extra benefit besides GitHub. GitLab is more generous on large file storage than GitHub, but still caps at 10GB of total space for each repo.
The UNM GitLab server is a community version of the GitLab open-source tool installed on an UNM server. Compared to others, the UNM GitLab service is good at hosting Git large files, which I don’t see if there is a real cap. So, it could be helpful to manage repos with data files without obvious limitations. But the total number of repos one can have on the server is limited (up to 10); also, since the service is associated with UNM NetIDs, it’s not clear in the documentations how the repos be treated once a student repo owner graduates from UNM.
Hopefully, this helps you on deciding which git remote server you want to use for your repos.